
# 玩转Linux虚拟机
# 1.VMware汉化
tips:下载地址:=》123云盘_VMware (123pan.com) (opens new window)
步骤:
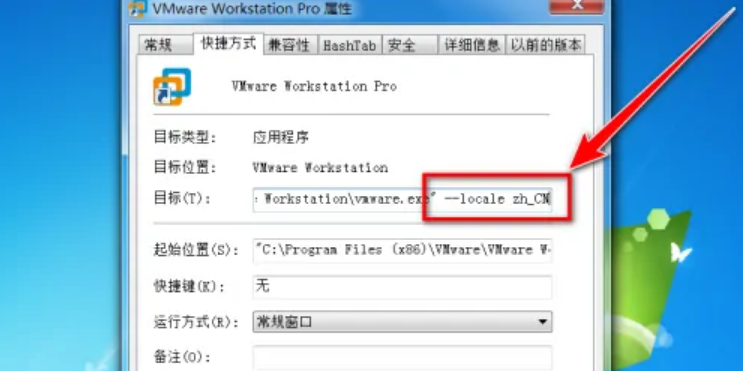
- 在桌面找到你的
VMware图标,右键打开属性- 选择
快捷方式,看目标那一栏- 在
原路径后面添加--locale zh_CN- 保存,重启VMware,你就会发现汉化OK!
# 2.安装centos7 mini
下载地址:https://mirrors.aliyun.com/centos/7/isos/x86_64/
Index of /centos-store/ (liu.se) (opens new window)
# 自定义分区
科普:
学Linux必须了解的系统分区!!!(通俗易懂)_熬夜泡枸杞的博客-CSDN博客_linux图形界面分区 (opens new window)
Linux系统分区_吮指原味张的博客-CSDN博客_linux系统分区 (opens new window)
【linux】文件管理系统之手动分区_是馄饨呀的博客-CSDN博客_linux手动分区 (opens new window)
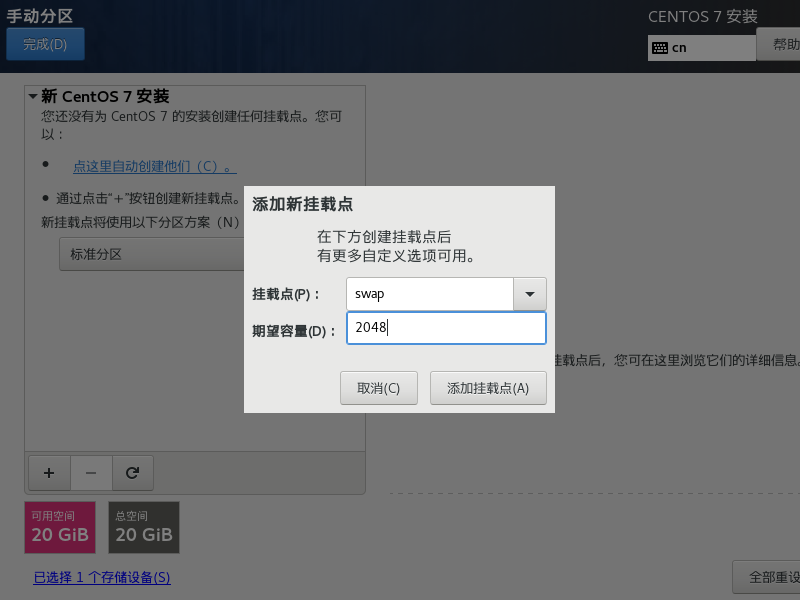
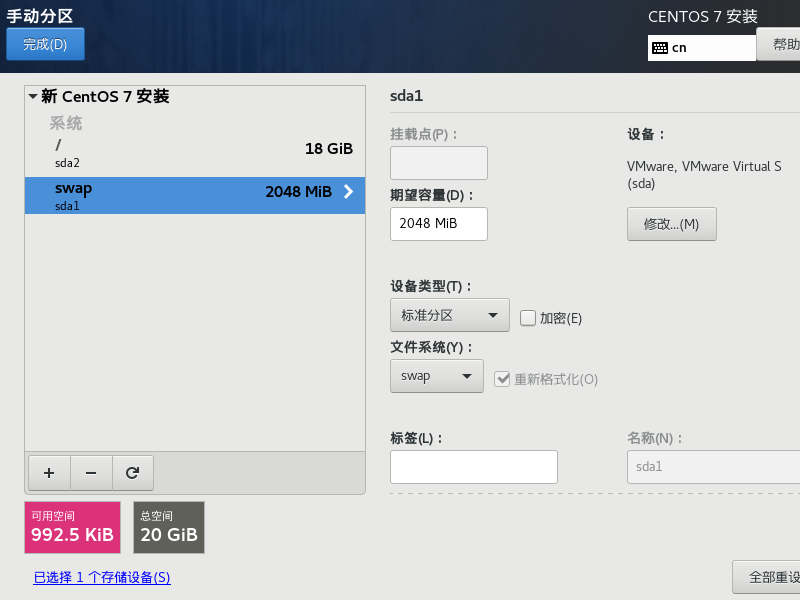
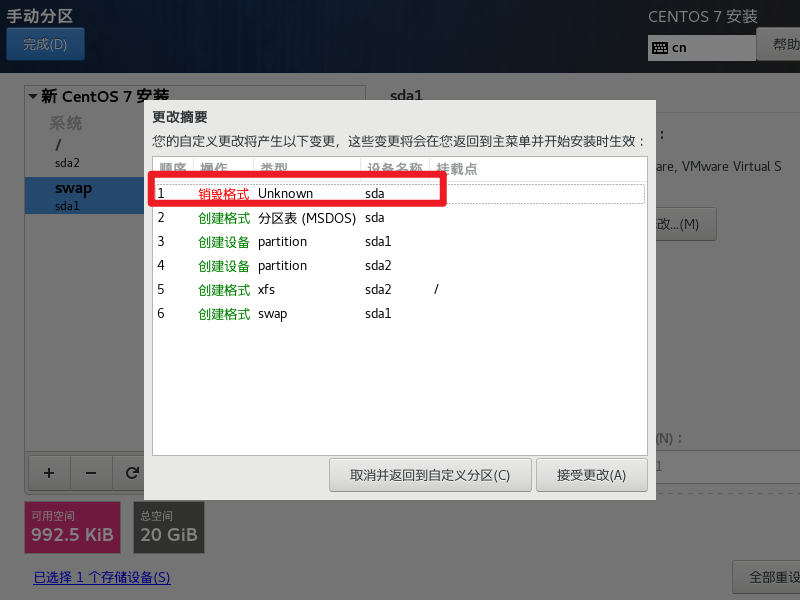
下方为VMware中安装centos mini版时手动分两个区的图示(swap区和"/"区)
# 3.动态获取IP
刚装的centos,你可能获取不到动态IP,类似下面的情况:
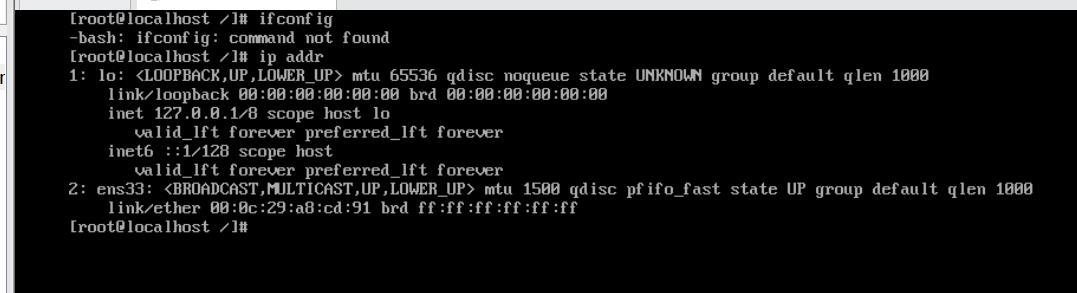
解决方案:
首先确定你网卡的名称,使用指令
ip addr即可查看。如上图,我的当前网卡名称是 ens33修改网卡配置文件:指令
vi /etc/sysconfig/network-scripts/ifcfg-[网卡名称]将配置文件中修改两处:
BOOTPROTO=dhcp,ONBOOT=yes。修改后(记得保存)如下:BOOTPROTO=dhcp DEVICE=eth0 HWADDR=52:54:00:d2:5a:83 ONBOOT=yes PERSISTENT_DHCLIENT=yes TYPE=Ethernet USERCTL=no重启网络服务:
systemctl restart network再次测试:
ip addr,就可以看到动态的IP了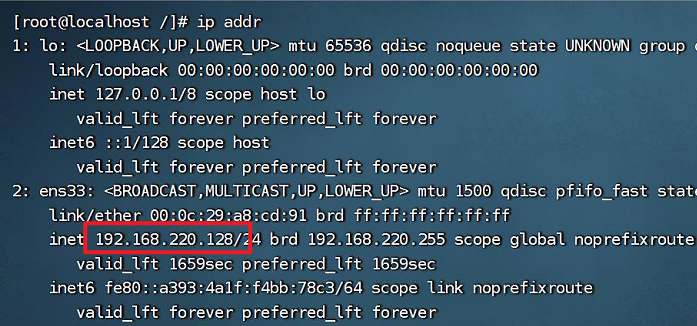
# 4.关闭SELinux
科普:SELinux是一个增强型的Linux,它是一个Linux的一个内核模块,是Linux的一个安全子系统。
具体可以参读:
一文彻底明白linux中的selinux到底是什么 - 知乎 (zhihu.com) (opens new window)
关闭步骤:
首先查看SELinux的状态是否开启,使用命令:
cat /etc/selinux/config如果你的
SELINUX=enforcing,说明SELinux处于开启状态将
SELINUX的值修改为disabled(如下)即可关闭(需要重启机器才能生效,快速重启:shutdown -r now)。[root@VM-16-12-centos ~]# cat /etc/selinux/config # This file controls the state of SELinux on the system. # SELINUX= can take one of these three values: # enforcing - SELinux security policy is enforced. # permissive - SELinux prints warnings instead of enforcing. # disabled - No SELinux policy is loaded. SELINUX=disabled # SELINUXTYPE= can take one of three values: # targeted - Targeted processes are protected, # minimum - Modification of targeted policy. Only selected processes are protected. # mls - Multi Level Security protection. SELINUXTYPE=targeted
# 5.安装Nginx
Nginx下载链接:nginx: download (opens new window)
安装教程参考:
LINUX安装nginx详细步骤_大蛇王的博客-CSDN博客_linux安装nginx (opens new window)
安装步骤网上都有很全,我就不在这里赘述了。
查看Nginx的版本号:nginx -V

启动Nginx:start nginx

快速停止或关闭Nginx:nginx -s stop

正常停止或关闭Nginx:nginx -s quit

配置文件修改重装载命令:nginx -s reload
下面列举下我遇到的问题:
问题1:安装前编译错误,如下图。
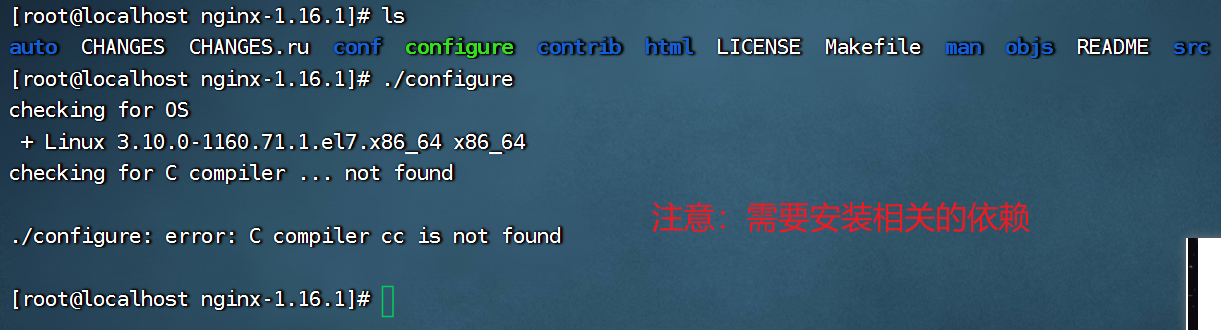
原因:是没有安装相关的依赖。
解决:先安装依赖
yum -y install gcc zlib zlib-devel pcre-devel openssl openssl-devel
问题2:安装好nginx后,在虚拟机上访客是能看到nginx的欢迎界面的,但是我将IP地址放到外面的window的浏览器却访问不到,如下图。

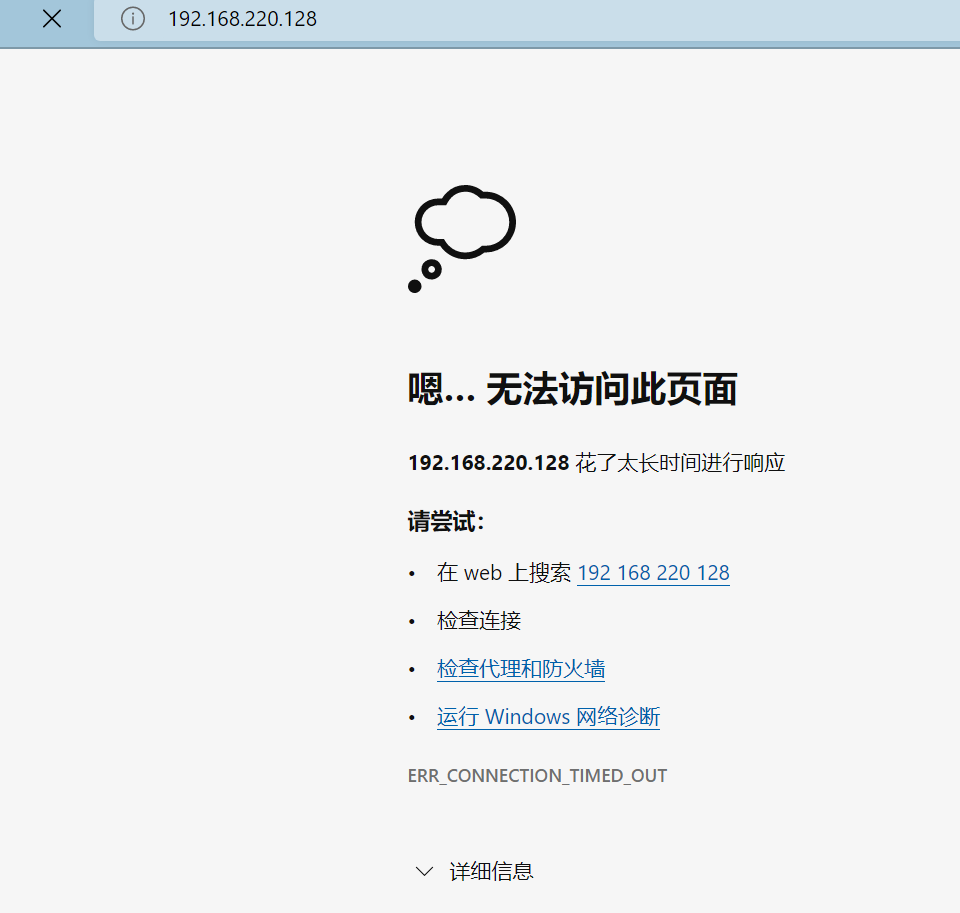
原因:防火墙没有开放相应的端口
解决:将
80端口打开(记得重启防火墙)

# 6.防火墙常用指令
查看防火墙状态:
systemctl status firewalld或firewall-cmd --state查看所有开启的端口:
firewall-cmd --list-ports手动开启端口:
firewall-cmd --zone=public --add-port=[端口号]/[tcp或者udp] --permanent设置防火墙开机自启:
systemctl enable firewalld.service查看防火墙是否开机自启:
systemctl is-enabled firewalld.service ;echo &?[root@VM-16-12-centos ~]# systemctl is-enabled firewalld.service ;echo &? enabled [1] 27811 -bash: ?: 未找到命令 [1]+ 完成 echo防火墙重启:
systemctl restart firewalld.service查看防火墙版本:
firewall-cmd --version永久关闭防火墙:
chkconfig iptables off
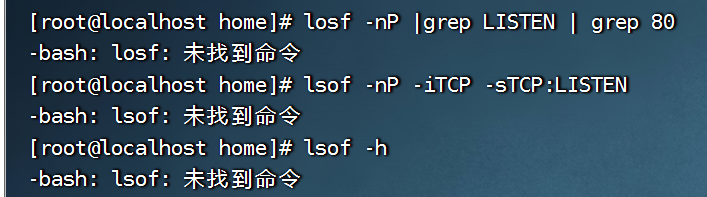
# 7.lsof命令没有找到?
# 8.手动安装命令依赖
场景:这次我测试安装的是
centos 7 mini版,也就是精简版,没有系统桌面等,因此,常常遇到下面的情况:当你输入一些命令的时候,系统提示你没有这个命令,如
lsof,ifconfig都没有预装。
解决方式:
先用
yum search [命令]找一下你需要安装哪个插件和工具,如这里我要找lsof相关的: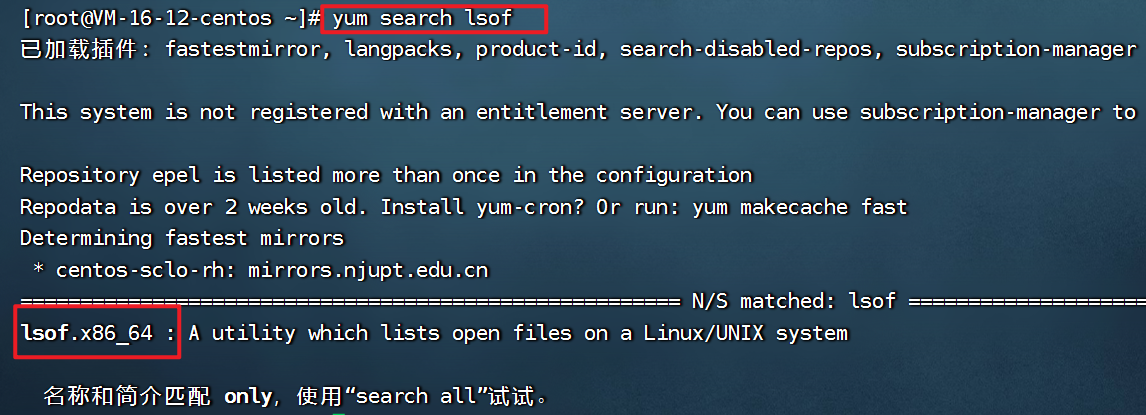
使用
yum install [名称]进行安装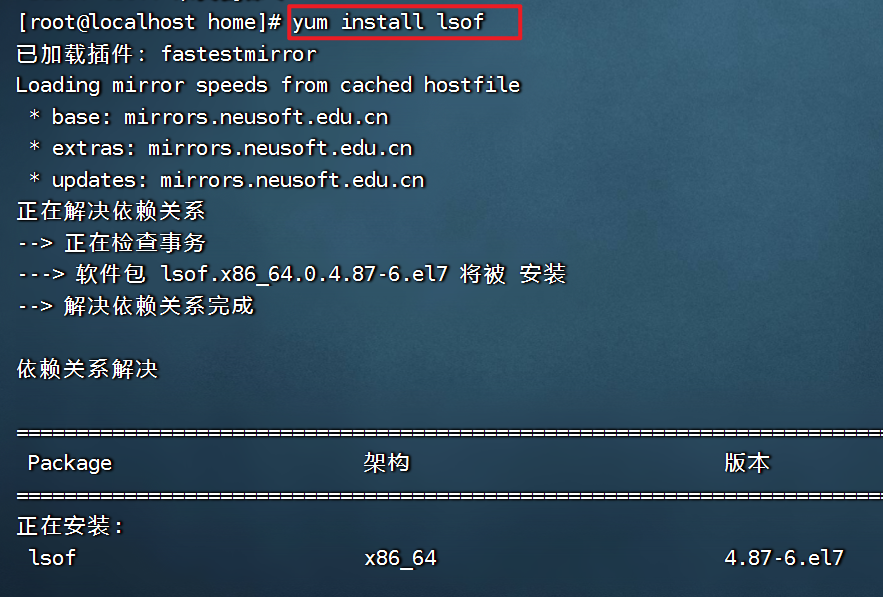
等安装完成后,就可以使用这个命令了。
(安装其他的命令也同理)
# 9.进程相关命令
1.查看进程号 或某个进程是否启动
[root@localhost home]# ps -ef | grep nginx
root      21939      1  0 10:55 ?        00:00:00 nginx: master process ./nginx
nobody    21940  21939  0 10:55 ?        00:00:00 nginx: worker process
root     111075   1374  0 14:43 pts/0    00:00:00 grep --color=auto nginx
2.查看pid与端口对应关系
[root@localhost home]# lsof -nP -iTCP -sTCP:LISTEN
COMMAND   PID   USER   FD   TYPE DEVICE SIZE/OFF NODE NAME
sshd      876   root    3u  IPv4  18972      0t0  TCP *:22 (LISTEN)
sshd      876   root    4u  IPv6  18981      0t0  TCP *:22 (LISTEN)
master   1104   root   13u  IPv4  20058      0t0  TCP 127.0.0.1:25 (LISTEN)
master   1104   root   14u  IPv6  20059      0t0  TCP [::1]:25 (LISTEN)
nginx   21939   root    6u  IPv4 119065      0t0  TCP *:80 (LISTEN)
nginx   21940 nobody    6u  IPv4 119065      0t0  TCP *:80 (LISTEN)
3.查看端口对应的线程
[root@localhost home]# lsof -nP -i :80
COMMAND   PID   USER   FD   TYPE DEVICE SIZE/OFF NODE NAME
nginx   21939   root    6u  IPv4 119065      0t0  TCP *:80 (LISTEN)
nginx   21940 nobody    6u  IPv4 119065      0t0  TCP *:80 (LISTEN)
4.查看进程对应的端口
[root@localhost home]# lsof -nP |grep LISTEN | grep 21939
nginx      21939         root    6u     IPv4             119065       0t0        TCP *:80 (LISTEN)
5.查看监听端口的进程
[root@localhost home]# lsof -nP |grep LISTEN |grep 80
nginx      21939         root    6u     IPv4             119065       0t0        TCP *:80 (LISTEN)
nginx      21940       nobody    6u     IPv4             119065       0t0        TCP *:80 (LISTEN)
# 10.系统相关
1.查看系统资源
[root@localhost lys]# vmstat 3 5
procs -----------memory---------- ---swap-- -----io---- -system-- ------cpu-----
 r  b   swpd   free   buff  cache   si   so    bi    bo   in   cs us sy id wa st
 1  0      0 1058580   2072 588056    0    0     6    14  108  132  0  0 99  0  0
 0  0      0 1058304   2072 588064    0    0     0     0  226  273  0  0 100  0  0
 0  0      0 1058388   2072 588076    0    0     0     6  178  215  0  1 99  0  0
 0  0      0 1058444   2072 588084    0    0     0    10  213  260  0  0 99  0  0
 0  0      0 1058296   2072 588100    0    0     0     3  210  256  0  0 100  0  0
2.CPU信息
[root@localhost lys]# dmesg | grep CPU
[    0.000000] smpboot: Allowing 128 CPUs, 126 hotplug CPUs
[    0.000000] Detected CPU family 6 model 140 stepping 1
[    0.000000] setup_percpu: NR_CPUS:5120 nr_cpumask_bits:128 nr_cpu_ids:128 nr_node_ids:1
[    0.000000] SLUB: HWalign=64, Order=0-3, MinObjects=0, CPUs=128, Nodes=1
[    0.000000]  RCU restricting CPUs from NR_CPUS=5120 to nr_cpu_ids=128.
[    0.737289] smpboot: CPU0: 11th Gen Intel(R) Core(TM) i7-1165G7 @ 2.80GHz (fam: 06, model: 8c, stepping: 01)
[    0.787916] core: CPUID marked event: 'cpu cycles' unavailable
[    0.787922] core: CPUID marked event: 'instructions' unavailable
[    0.787928] core: CPUID marked event: 'bus cycles' unavailable
[    0.787935] core: CPUID marked event: 'cache references' unavailable
[    0.787941] core: CPUID marked event: 'cache misses' unavailable
[    0.787947] core: CPUID marked event: 'branch instructions' unavailable
[    0.787953] core: CPUID marked event: 'branch misses' unavailable
[    0.807789] smpboot: CPU 1 Converting physical 2 to logical package 1
[    0.807796] smpboot: CPU 1 Converting physical 0 to logical die 1
[    0.807896] Brought up 2 CPUs
3.使用情况
top - 15:13:27 up  4:37,  2 users,  load average: 0.02, 0.03, 0.05
Tasks: 114 total,   1 running, 113 sleeping,   0 stopped,   0 zombie
top - 15:15:13 up  4:39,  2 users,  load average: 0.06, 0.03, 0.05
top - 15:16:14 up  4:40,  2 users,  load average: 0.02, 0.03, 0.05
Tasks: 115 total,   1 running, 114 sleeping,   0 stopped,   0 zombie
%Cpu(s):  0.2 us,  0.3 sy,  0.0 ni, 99.3 id,  0.0 wa,  0.0 hi,  0.2 si,  0.0 st
KiB Mem :  1862992 total,  1064840 free,   214692 used,   583460 buff/cache
KiB Swap:  2097148 total,  2097148 free,        0 used.  1475700 avail Mem

   PID USER      PR  NI    VIRT    RES    SHR S  %CPU %MEM     TIME+ COMMAND
     9 root      20   0       0      0      0 S   0.3  0.0   0:11.23 rcu_sched
  1372 root      20   0  162128   6540   4780 S   0.3  0.4   1:19.96 sshd
  1436 root      20   0  162732   2980   1604 S   0.3  0.2   0:14.53 top
     1 root      20   0  125352   3872   2608 S   0.0  0.2   0:02.53 systemd
     2 root      20   0       0      0      0 S   0.0  0.0   0:00.02 kthreadd
     4 root       0 -20       0      0      0 S   0.0  0.0   0:00.00 kworker/0:0H
     5 root      20   0       0      0      0 S   0.0  0.0   0:00.71 kworker/u256:0
     6 root      20   0       0      0      0 S   0.0  0.0   0:05.60 ksoftirqd/0
     7 root      rt   0       0      0      0 S   0.0  0.0   0:01.93 migration/0
     8 root      20   0       0      0      0 S   0.0  0.0   0:00.00 rcu_bh
    10 root       0 -20       0      0      0 S   0.0  0.0   0:00.00 lru-add-drain
    11 root      rt   0       0      0      0 S   0.0  0.0   0:00.23 watchdog/0
    12 root      rt   0       0      0      0 S   0.0  0.0   0:00.22 watchdog/1
    13 root      rt   0       0      0      0 S   0.0  0.0   0:01.19 migration/
4.内存信息查看
[root@localhost lys]# free
              total        used        free      shared  buff/cache   available
Mem:        1862992      214140     1064896        9768      583956     1476252
Swap:       2097148           0     2097148
5.磁盘信息
[root@localhost lys]# df -h
文件系统        容量  已用  可用 已用% 挂载点
devtmpfs        900M     0  900M    0% /dev
tmpfs           910M     0  910M    0% /dev/shm
tmpfs           910M  9.6M  901M    2% /run
tmpfs           910M     0  910M    0% /sys/fs/cgroup
/dev/sda2        18G  1.7G   17G   10% /
tmpfs           182M     0  182M    0% /run/user/0
6.网卡信息
[root@localhost lys]#  ifconfig
ens33: flags=4163<UP,BROADCAST,RUNNING,MULTICAST>  mtu 1500
        inet 192.168.220.128  netmask 255.255.255.0  broadcast 192.168.220.255
        inet6 fe80::a393:4a1f:f4bb:78c3  prefixlen 64  scopeid 0x20<link>
        ether 00:0c:29:a8:cd:91  txqueuelen 1000  (Ethernet)
        RX packets 381262  bytes 103026975 (98.2 MiB)
        RX errors 0  dropped 0  overruns 0  frame 0
        TX packets 535639  bytes 96851931 (92.3 MiB)
        TX errors 0  dropped 0 overruns 0  carrier 0  collisions 0

lo: flags=73<UP,LOOPBACK,RUNNING>  mtu 65536
        inet 127.0.0.1  netmask 255.0.0.0
        inet6 ::1  prefixlen 128  scopeid 0x10<host>
        loop  txqueuelen 1000  (Local Loopback)
        RX packets 92  bytes 9058 (8.8 KiB)
        RX errors 0  dropped 0  overruns 0  frame 0
        TX packets 92  bytes 9058 (8.8 KiB)
        TX errors 0  dropped 0 overruns 0  carrier 0  collisions 0
# 11.给vi编辑器设置行数显示
很简单,三步搞定!
- 首先打开配置文件:
vi ~/.vimrc - 编辑输入
set number - 保存退出
当你下次再打开vi的时候,就会发现显示行号了!
# 在docker容器中安装vi
apt-get update
apt-get install vim
# 鼠标移动光标
命令模式下,输入set mouse=a
# 12.Linux常用指令
参考:
重点摘要:
- 查看包含隐藏文件的列表:
ls -a - 清屏快捷键:
ctrl + l
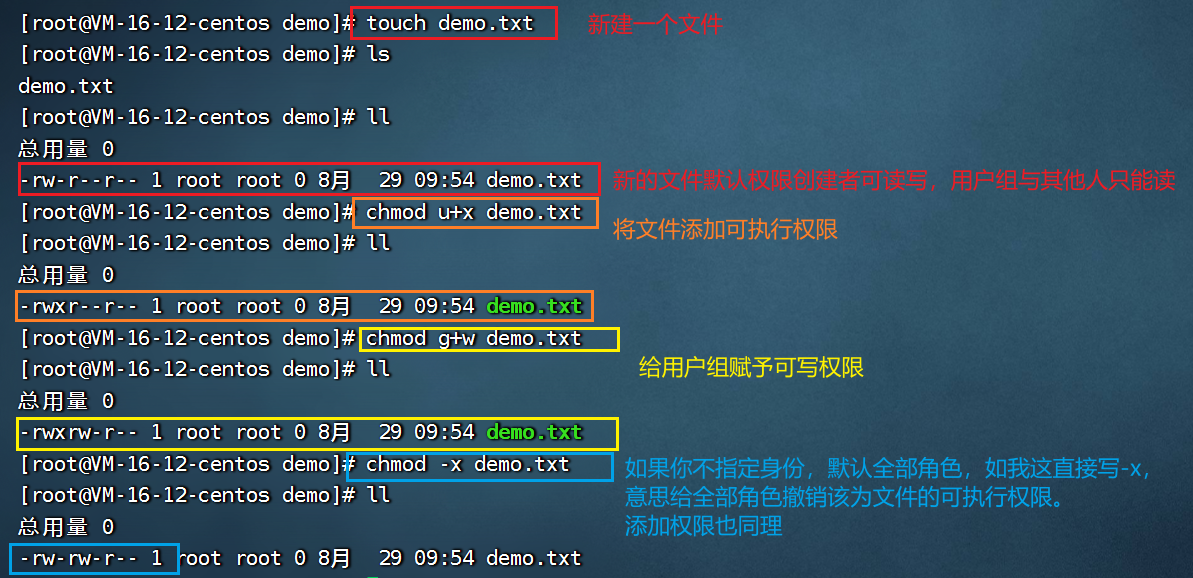
# 13.权限修改
文件属性信息:
参考:
Linux文件属性详述 - JZEason - 博客园 (cnblogs.com) (opens new window)
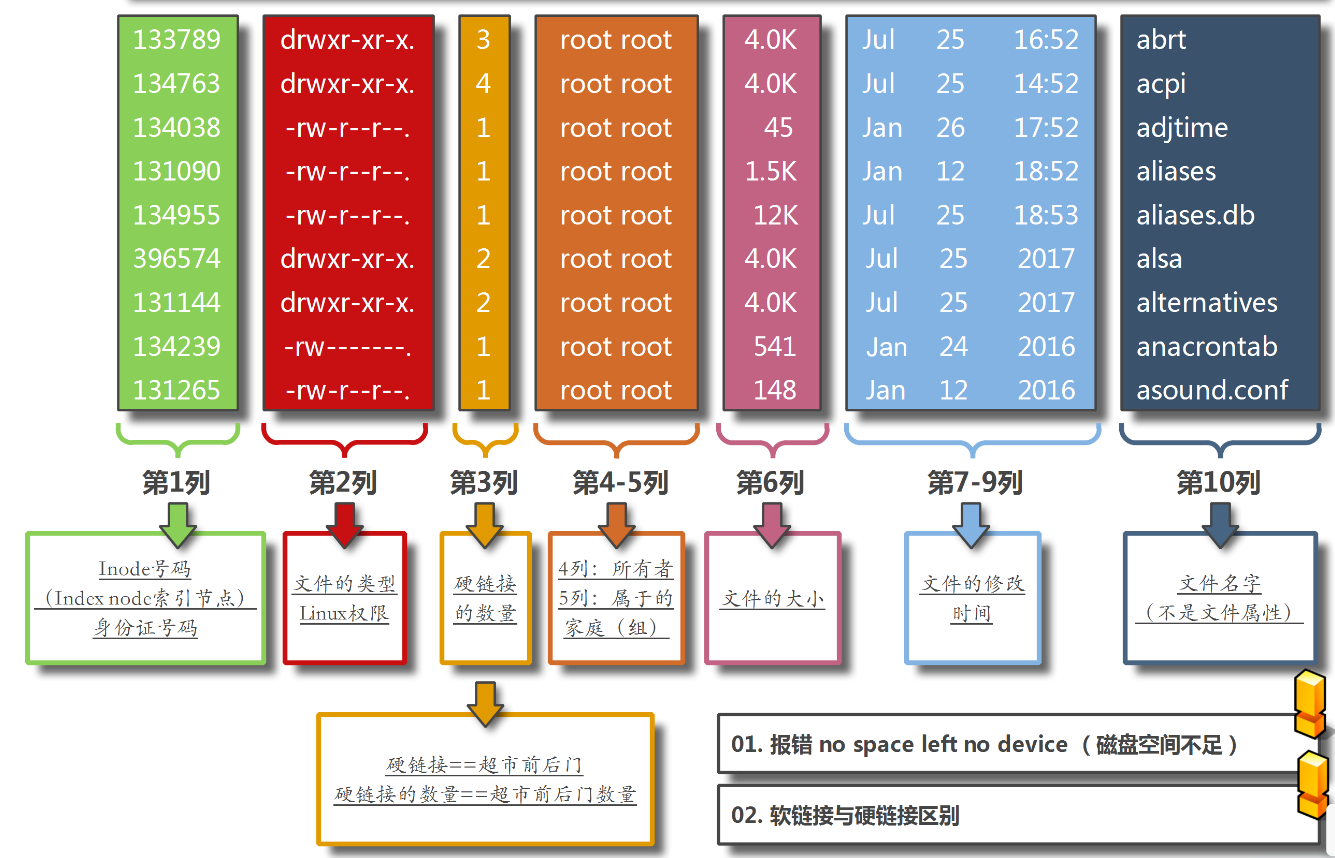
演示:
权限标示:r-可读,w-可写,x-可执行
权限分配角色:u-文件创建者 g-用户所在组,o-用户组外的其他人
# 14.文件:打包、压缩与解压
参考学习:tar 解压缩命令详解_追求者2016的博客-CSDN博客_tar (opens new window)
使用系统自带的 tar 工具即可完成文件的压缩与解压。
参数说明:
- -c: 建立压缩档案
- -x:解压
- -t:查看内容
- -r:向压缩归档文件末尾追加文件
- -u:更新原压缩包中的文件
可选参数:
- -z:有gzip属性的
- -j:有bz2属性的
- -J:具有xz属性的
- -Z:有compress属性的
- -v:显示所有过程
- -O:将文件解开到标准输出
# 打包
仅打包,不压缩。
命令:tar -cvf [打包后文件名称] [要打包的文件]
示例:创建两个文件夹,并打包(如果打包全部文件,可以直接用*代替)
[root@VM-16-12-centos demo]# touch d1.txt
[root@VM-16-12-centos demo]# touch d2.java
[root@VM-16-12-centos demo]# ll
总用量 0
-rw-r--r-- 1 root root 0 8月  24 23:31 d1.txt
-rw-r--r-- 1 root root 0 8月  24 23:31 d2.java
[root@VM-16-12-centos demo]# tar -cvf d.tar ./*
./d1.txt
./d2.java
[root@VM-16-12-centos demo]# ls
d1.txt  d2.java  d.tar
[root@VM-16-12-centos demo]# ll
总用量 12
-rw-r--r-- 1 root root     0 8月  24 23:31 d1.txt
-rw-r--r-- 1 root root     0 8月  24 23:31 d2.java
-rw-r--r-- 1 root root 10240 8月  24 23:32 d.tar
# 压缩
先打包,后压缩。以gzip压缩 在参数f后面的压缩文件名是自己取的,习惯上用tar来做,如果加z参数,则以tar.gz 或tgz来代表gzip压缩过的tar file文件。
命令:tar -zcvf [打包后文件名] [-C] [指定输出父目录] [文件]
示例:
[root@VM-16-12-centos demo]# ls
d1.txt  d2.java
[root@VM-16-12-centos demo]# tar -zcvf d.tar.gz ./*
./d1.txt
./d2.java
[root@VM-16-12-centos demo]# ls
d1.txt  d2.java  d.tar.gz
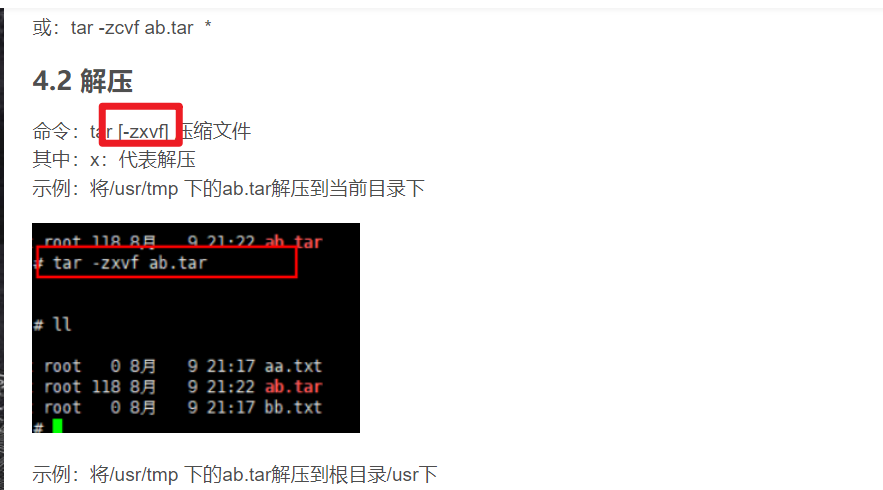
# 解压
命令:tar -zxvf [压缩包] [-C] [解压位置]
示例:
[root@VM-16-12-centos demo]# ls
d.tar.gz
[root@VM-16-12-centos demo]# tar -zxvf d.tar.gz
./d1.txt
./d2.java
[root@VM-16-12-centos demo]# ls
d1.txt  d2.java  d.tar.gz
[root@VM-16-12-centos demo]#
# 避雷=》
tar 的命令参数一定要写完整,否则会出现卡住,无响应的情况。
否则会报错:

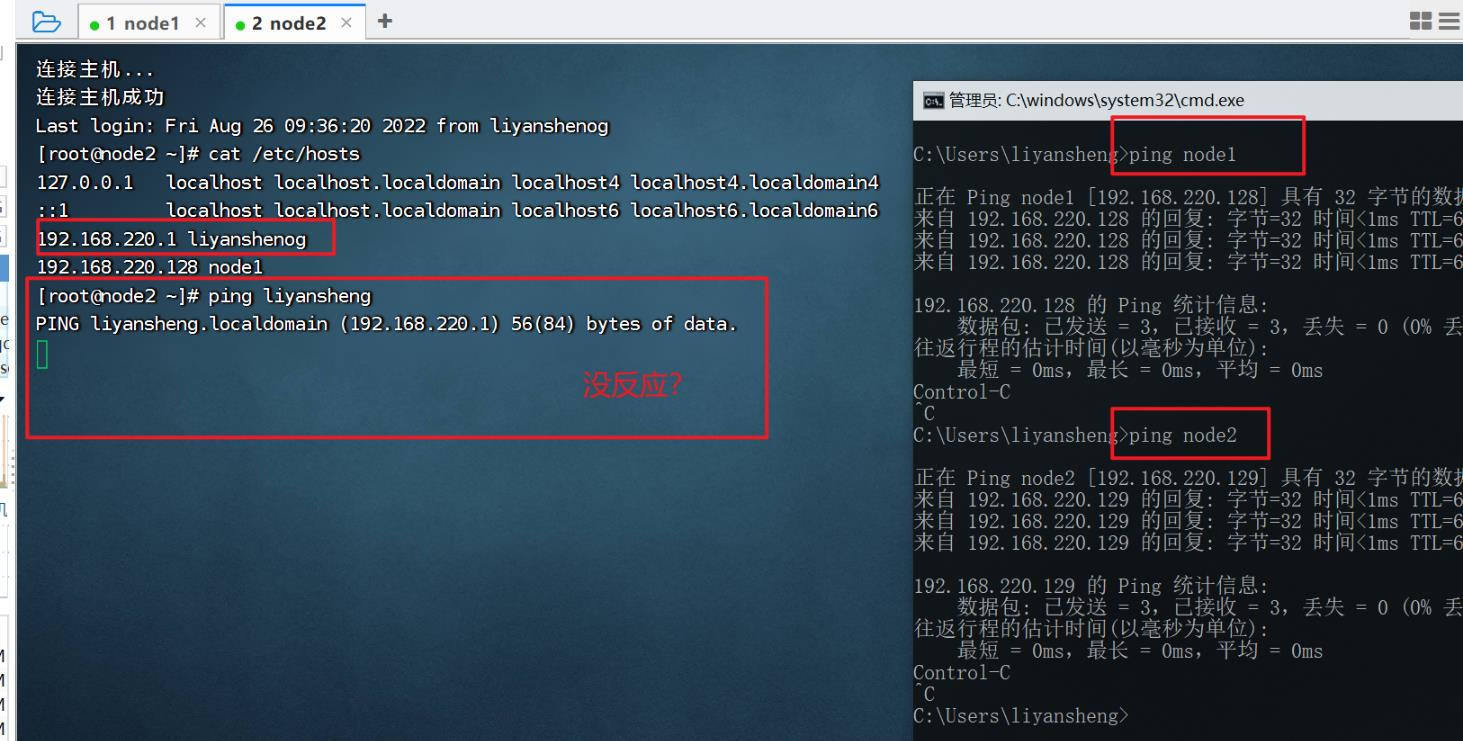
# 15.自定义主机名(多节点)互ping通
自定义主机名:hostnamectl set-hostname [主机名]
查看主机名:hostname
路径C:\Windows\System32\drivers\etc
末尾添加:192.168.220.128 node1
ping测试:打开cmd,直接ping主机名
问题1:
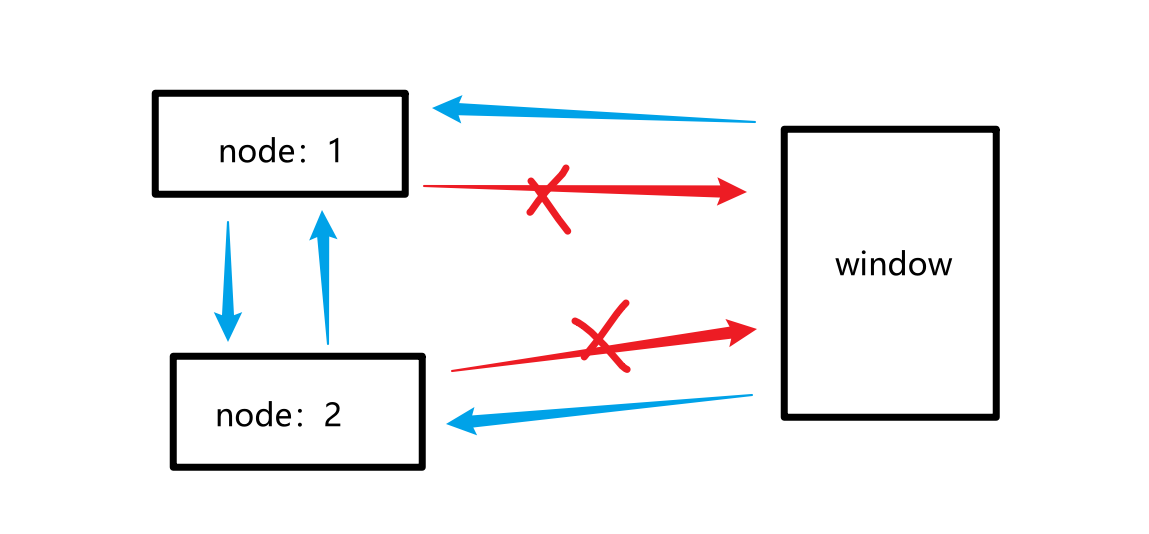
linux =>win ping不通

win => linux 可以ping通
解决:win的防火墙没关 关闭防火墙命令:netsh advfirewall set allprofiles state off
更多防火墙操作,可以参考:
windows防火墙常用命令 - 苍山落暮 - 博客园 (cnblogs.com) (opens new window)
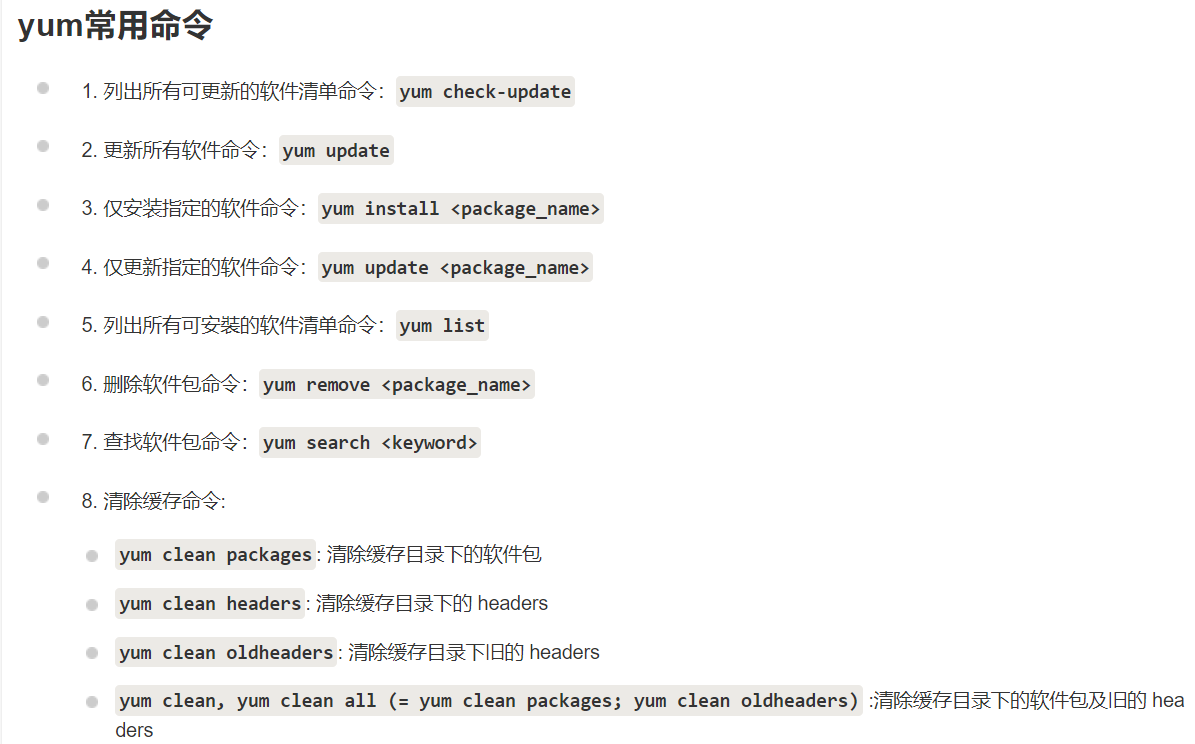
# 16.yum配置
yum 主要功能是更方便的
添加/删除/更新RPM包,自动解决包的依赖性问题,便于管理大量系统的更新问题。学习参考:
原装镜像源:位于/etc/yum.repos.d/的CentOS-Base.repo
优质镜像源:
- CentOS镜像使用帮助 (163.com) (opens new window)
- centos镜像_centos下载地址_centos安装教程-阿里巴巴开源镜像站 (aliyun.com) (opens new window)
如要修改原镜像源,请:
- 将下载的镜像源文件放入
/etc/yum.repos.d/目录下 - 清除yum缓存:
yum clear all - 刷新:
yum makecache
补充:
# 17.软件常用配置路径
学习参考:
linux常用的文件路径_爪穴心久的博客-CSDN博客_linux常用文件路径 (opens new window)
Linux配置文件路径大全 - 腾讯云开发者社区-腾讯云 (tencent.com) (opens new window)
# 18.systemd服务管理(难点)
systemd 介绍 - taotaozh - 博客园 (cnblogs.com) (opens new window)
Linux 之systemd服务简介_Tian_cy_的博客-CSDN博客_linux systemd (opens new window)
Systemd 入门教程:实战篇_道素的博客-CSDN博客_systemd (opens new window)
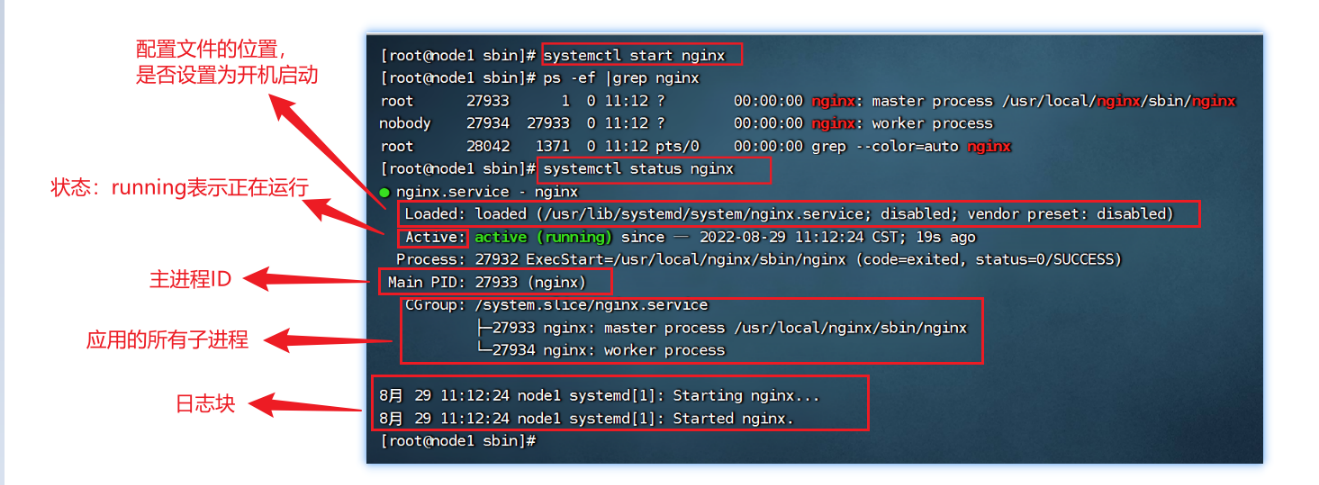
# 使用systemd启动Nginx
编写配置文件:
[Unit]
Description=nginx
After=network.target

[Service]
Type=forking
ExecStart=/usr/local/nginx/sbin/nginx
ExecReload=/usr/local/nginx/sbin/nginx -s reload
ExecStop=/usr/local/nginx/sbin/nginx -s quit
PrivateTmp=true

[Install]
WantedBy=multi-user.target
启动、查看运行状态:
# 19.神奇的 tail
tail用于查看文件的内容
常用参数:
-f:查阅正在改变的日志文件
Print the last 10 lines of each FILE to standard output.
With more than one FILE, precede each with a header giving the file name.
With no FILE, or when FILE is -, read standard input.

Mandatory arguments to long options are mandatory for short options too.
  -c, --bytes=K            output the last K bytes; or use -c +K to output
                             bytes starting with the Kth of each file
  -f, --follow[={name|descriptor}]
                           output appended data as the file grows;
                             an absent option argument means 'descriptor'
  -F                       same as --follow=name --retry
  -n, --lines=K            output the last K lines, instead of the last 10;
                             or use -n +K to output starting with the Kth
      --max-unchanged-stats=N
                           with --follow=name, reopen a FILE which has not
                             changed size after N (default 5) iterations
                             to see if it has been unlinked or renamed
                             (this is the usual case of rotated log files);
                             with inotify, this option is rarely useful
      --pid=PID            with -f, terminate after process ID, PID dies
  -q, --quiet, --silent    never output headers giving file names
      --retry              keep trying to open a file if it is inaccessible
  -s, --sleep-interval=N   with -f, sleep for approximately N seconds
                             (default 1.0) between iterations;
                             with inotify and --pid=P, check process P at
                             least once every N seconds
  -v, --verbose            always output headers giving file names
      --help            显示此帮助信息并退出
      --version         显示版本信息并退出
# 20.sed命令
用于脚本处理文本内容,实现自动编辑,简化对文件的反复操作
# 21.后台启动命令
(51条消息) linux后台永久启动Kafka、Flume命令(测试通过)_卢子墨的博客-CSDN博客_linux后台启动kafka (opens new window)
命令前添加nohup
a. 1>/dev/null 2>&1 是将命令产生的输入和错误都输入到空设备,也就是不输出的意思。/dev/null 代表空设备,“/”不要漏掉,否则会报 -bash: dev/null not a file or dirctory 的错误 ;
b. /home/espai/kafka/ 指的是config/server.properties存在的路径,可以根据自己安装的路径进行修改。
c. 启动命令首位加上nohup,即使停掉crt,kafka、flume依然可以在后台执行,这样就不用每次登陆,重新运行启动命令了。如果需要停掉服务,只需运行 kill -9 [程序运行的号即可,比如上面kafka的是15568] --> kill -9 15568
← 初学shell常用操作 pm2进程管理工具 →